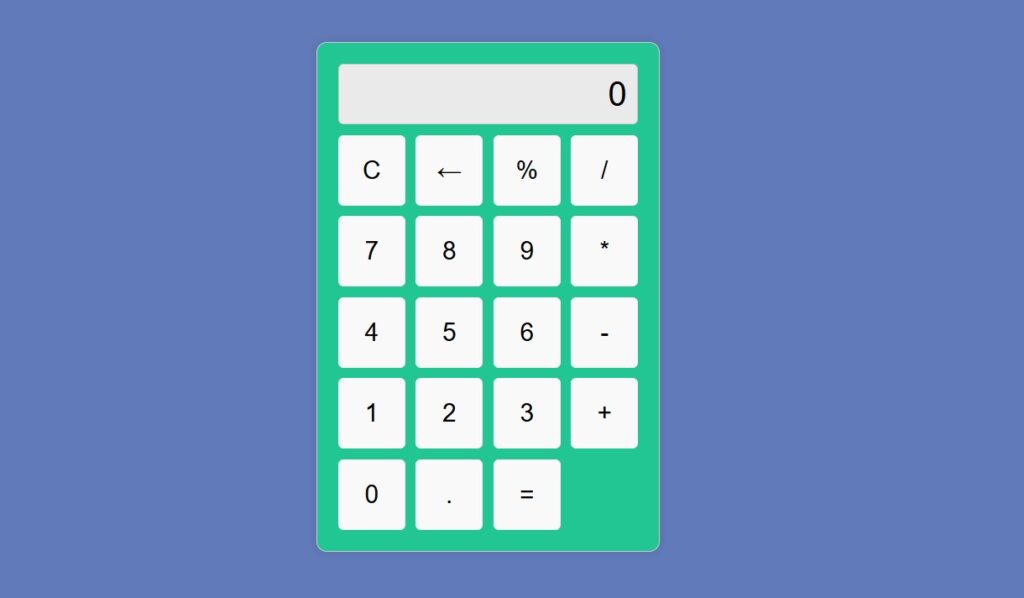
Build a Calculator with HTML, CSS and JavaScript
Starting from scratch to Build a Calculator with HTML, CSS and JavaScript for your website is a good strategy to master basic concepts for web development.
In this tutorial, We’ll Build a Calculator using HTML for structure, CSS for styling, and JavaScript for functionality.
To begin with web development, you can pursue several projects including that of building a simple calculator. The reason this project is particularly of multifarious use is because it enables one to practice the basic usage of HTML and CSS and at the same time demonstrates how one can incorporate some level of interactivity on a web page with the use of JavaScript.
A calculator is a basic necessity, if you’re a users, regardless of whether you can multiply, divide, add or subtract. It is also a great time saver when one is required to do some quick calculations. The HTML calculator is designed to help people with very simple mathematical problems that require addition, subtraction, multiplication or division. In this guide, we will go through the process of building a calculator from scratch using HTML and CSS.
What You’ll Learn:
- How to structure the Calculator with HTML
- How to style the Calculator using CSS
- How to make the Calculator functional with JavaScript
Step 1: Setting up the HTML Structure
Start by creating a new file called (index.html). Then, copy and paste the HTML code provided into this file. Remember to save it with the (.html) extension.
<!DOCTYPE html>
<html lang="en">
<head>
    <meta charset="UTF-8">
    <meta name="viewport" content="width=device-width, initial-scale=1.0">
    <title>Simple Calculator</title>
    <link rel="stylesheet" href="styles.css">
</head>
<body>
    <div class="calculator">
        <div class="display" id="display">0</div>
        <div class="buttons">
            <button class="btn" onclick="clearDisplay()">C</button>
            <button class="btn" onclick="deleteLast()">←</button>
            <button class="btn" onclick="appendOperator('%')">%</button>
            <button class="btn" onclick="appendOperator('/')">/</button>
            <button class="btn" onclick="appendNumber('7')">7</button>
            <button class="btn" onclick="appendNumber('8')">8</button>
            <button class="btn" onclick="appendNumber('9')">9</button>
            <button class="btn" onclick="appendOperator('*')">*</button>
            <button class="btn" onclick="appendNumber('4')">4</button>
            <button class="btn" onclick="appendNumber('5')">5</button>
            <button class="btn" onclick="appendNumber('6')">6</button>
            <button class="btn" onclick="appendOperator('-')">-</button>
            <button class="btn" onclick="appendNumber('1')">1</button>
            <button class="btn" onclick="appendNumber('2')">2</button>
            <button class="btn" onclick="appendNumber('3')">3</button>
            <button class="btn" onclick="appendOperator('+')">+</button>
            <button class="btn" onclick="appendNumber('0')">0</button>
            <button class="btn" onclick="appendNumber('.')">.</button>
            <button class="btn" onclick="calculateResult()">=</button>
        </div>
    </div>
    <script src="script.js"></script>
</body>
</html>
Step 2: Styling the Calculator with CSS
Create a new file called (style.css) and copy the provided code into this file. Don’t forget to save it with the (.css) extension.
body {
    display: flex;
    justify-content: center;
    align-items: center;
    height: 100vh;
    background-color: #f0f0f0;
    font-family: Arial, sans-serif;
}

.calculator {
    border: 1px solid #ccc;
    border-radius: 10px;
    padding: 20px;
    background-color: #fff;
    box-shadow: 0 0 10px rgba(0, 0, 0, 0.1);
}

.display {
    font-size: 2em;
    margin-bottom: 10px;
    padding: 10px;
    border: 1px solid #ccc;
    border-radius: 5px;
    text-align: right;
    background-color: #eaeaea;
}

.buttons {
    display: grid;
    grid-template-columns: repeat(4, 1fr);
    gap: 10px;
}

.btn {
    padding: 20px;
    font-size: 1.5em;
    border: none;
    border-radius: 5px;
    background-color: #f9f9f9;
    cursor: pointer;
}

.btn:hover {
    background-color: #e0e0e0;
}
Step 3: Adding Calculator JavaScript Functionality
Create a new file named (script.js), then copy and paste the JavaScript code into this file. Be sure to save it with the (.js) extension.
let display = document.getElementById('display');

function clearDisplay() {
    display.innerText = '0';
}

function deleteLast() {
    if (display.innerText.length > 1) {
        display.innerText = display.innerText.slice(0, -1);
    } else {
        display.innerText = '0';
    }
}

function appendNumber(number) {
    if (display.innerText === '0') {
        display.innerText = number;
    } else {
        display.innerText += number;
    }
}

function appendOperator(operator) {
    display.innerText += operator;
}

function calculateResult() {
    try {
        display.innerText = eval(display.innerText);
    } catch {
        display.innerText = 'Error';
    }
}
Final Words
That’s all, now you’ve successfully created a Calculator. If you experience any challenges while creating your calculator or your code is malfunctioning, you can get the source code files for your calculator without any charge by clicking on the download button.
Happy Coding!