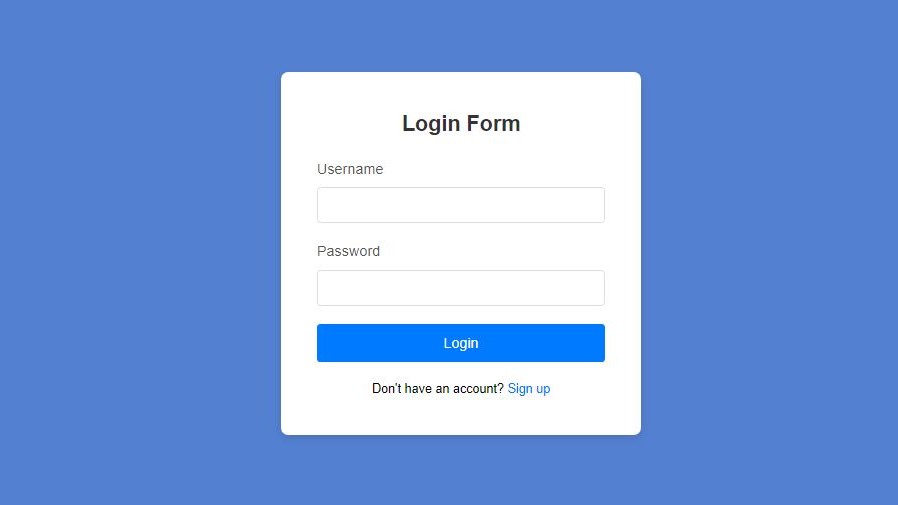
Creating a simple login form is one of the first things you’ll do when you start learning web development. It’s an excellent way to get hands-on experience with HTML for structure, CSS for styling, and JavaScript for form validation. In this guide, we’ll show you how to build a functional and stylish login form from scratch. By the end of this tutorial, you’ll be able to create a login form that you can easily integrate into any website or project..
What Is a Login Form
A login form is an essential part of most websites and web applications. It helps protect user data and gives access to personalized content. For beginners, creating a login form is a great way to understand the basics of web development and how HTML and CSS work together to create interactive web pages.
Why Use HTML and CSS for a Login Form?
- HTML provides the basic structure and layout of the form.
- CSS is used to style the form, making it visually attractive and user-friendly
Step 1: Building the HTML Structure
To start, we’ll write the basic HTML code for our login form. It will include a username field, password field, and a submit button.
Creating a new file called (index.html). Then, copy and paste the HTML code provided into this file. Remember to save it with the (.html) extension.
<!DOCTYPE html>
<html lang="en">
<head>
    <meta charset="UTF-8">
    <meta name="viewport" content="width=device-width, initial-scale=1.0">
    <title>Login Page</title>
    <link rel="stylesheet" href="styles.css">
</head>
<body>
    <div class="login-container">
        <h2>Login Form</h2>
        <form action="#" method="POST" class="login-form">
            <div class="input-group">
                <label for="username">Username</label>
                <input type="text" id="username" name="username" required>
            </div>
            <div class="input-group">
                <label for="password">Password</label>
                <input type="password" id="password" name="password" required>
            </div>
            <button type="submit" class="login-btn">Login</button>
        </form>
        <div class="signup-link">
            <p>Don't have an account? <a href="#">Sign up</a></p>
        </div>
    </div>
</body>
</html>
Step 2: Styling the Login Form with CSS
Now let’s add some CSS to style the login form and make it look attractive.
Create a new file called (style.css) and copy the provided code into this file. Don’t forget to save it with the (.css) extension.
/* Basic styling for the page */
* {
    margin: 0;
    padding: 0;
    box-sizing: border-box;
    font-family: Arial, sans-serif;
}

body {
    display: flex;
    justify-content: center;
    align-items: center;
    height: 100vh;
    background-color: #5480d1;
}

.login-container {
    background-color: white;
    padding: 40px;
    border-radius: 8px;
    box-shadow: 0 4px 10px rgba(0, 0, 0, 0.1);
    width: 100%;
    max-width: 400px;
    text-align: center;
}

h2 {
    margin-bottom: 20px;
    font-size: 24px;
    color: #333;
}

/* Input fields styling */
.input-group {
    margin-bottom: 20px;
    text-align: left;
}

.input-group label {
    display: block;
    margin-bottom: 8px;
    color: #555;
}

.input-group input {
    width: 100%;
    padding: 10px;
    font-size: 16px;
    border: 1px solid #ddd;
    border-radius: 4px;
}

.input-group input:focus {
    border-color: #007bff;
    outline: none;
}

/* Login button styling */
.login-btn {
    width: 100%;
    padding: 12px;
    background-color: #007bff;
    color: white;
    font-size: 16px;
    border: none;
    border-radius: 4px;
    cursor: pointer;
}

.login-btn:hover {
    background-color: #0056b3;
}

/* Signup link styling */
.signup-link {
    margin-top: 20px;
    font-size: 14px;
}

.signup-link a {
    color: #007bff;
    text-decoration: none;
}

.signup-link a:hover {
    text-decoration: underline;
}
How It Works ?
HTML: The structure of the form is constructed through the use of <form>, <input>, and <button> elements. The required attribute is added to the input fields to ensure they are not left empty.
CSS: The form is centered on the page, styled with padding and background colour, and made responsive with flexible layout properties.
Conclusion
In this post, we’ve learned how to create a simple yet attractive login form using just HTML and CSS. With just a few lines of code, we’ve created a functional and visually appealing form that can be easily customized or expanded.
Happy Coding!
